Modification to an Étagère

I received a commission recently from a designer.  Her clients had an Étagère which they were not happy with.  The piece was too tall for the room in which they had it displayed and so they wanted to know if it was possible to cut it down.  I met with them and the designer and we decided that the modification was possible.  The goal was to re-size the piece, while making the joints near invisible and also maintain the structural integrity of the piece.

From Wikipedia: 

An étagère is a piece of light furniture which was extensively made in France during the latter part of the 18th century. It consists of a series of stages or shelves for the reception of ornaments or other small articles. Like the what-not it was very often corner wise in shape, and the best Louis XVI examples in exotic woods are exceedingly graceful and elegant.


As you can see from the image below the piece was very tall, 88″.
IMG_0656

My initial thought was to make a cut below the second lowest shelf and then move the feet to the underside of that shelf.  From the standpoint of hiding the joint that would have been the simplest way.  However there were a couple of details on the upright just above the bottom shelf which needed to be preserved, so it was decided that each upright needed to be cut in two places, once just below the third lowest shelf and once just below the second lowest shelf.   Then the second lowest shelf would be discarded and the lowest shelf moved up one section.

IMG_0657

In theory it was a very simple plan.  Eight cuts and then glue it back together.  In practice it required a lot of thought, problem solving and attention to detail in order to accomplish the cuts and then rejoining the pieces, all while achieving the goal of invisible joints and maintaining the structural integrity of the piece.

Once I got the piece to my workshop, I set it aside for a couple of days while I thought carefully about each step.  The photo essay below shows how I went about making the modification.

I opted to make the cuts using a flush cut saw.  I could see no way to make the cuts cleanly and safely using a power saw of any sort.  While a power saw can make a quick cut, in this situation I just saw to much potential for things to go horribly wrong really quickly.  The first step was to tape around each upright piece to support the wood fibers as much as possible during the cut and ensure a clean cut with little to no tear out.  I also taped some pieces of Formica to the underside of the shelf so that the saw did not scratch that surface.  I needed to make the cut as close as possible to the underside of the shelf in order to maintain the length of the upright piece.  The thin kerf of the flush cut saw would also help achieve that goal.

IMG_0659

The Étagère is an expensive and beautiful piece of furniture, so needless to say the first cut was make with some trepidation.  However, once I had started the cut I was committed!

IMG_0660

Once each cut was made on the upright I clamped a scrap piece of plywood over the cut to act as a sort of “splint” and hold that section together while I made the subsequent cuts.

IMG_0661

The bottom shelf and uprights cut loose and waiting to be reattached.  The piece of blue tape was put on the shelf before I started the cuts and marked the front of the piece so that I could maintain the correct orientation when reattaching it to the main section.

IMG_0662

The next thing I needed to do was to make a jig.  This always makes my wife smile, as she maintains that my day is complete if I get to design and fashion a jig!  My plan was to route holes in the upright in order to accept a dowel.  The dowel would ensure the structural integrity of the piece once glued together.  The holes in the two pieces needed to line up perfectly and my goal in achieving this was to register the jig from the same two surfaces of each upright.  The one thing complicating it was the overhang of the shelf, and so I needed to cut a groove in the jig so that it wrapped over the overhanging shelf.  I then needed to ensure that the hole in the jig that would guide the router bit was as close to the center of the upright as possible.  My hope was that if it was off a tiny bit, then the fact that the jig was referenced off the same two surfaces on each piece would compensate for this and the two uprights would still line up perfectly.  This part of the theory, which sounded great in theory, could only be tested in practice, which added a bit of tension to the whole procedure.

IMG_0663

The guide hole lined up with the center of  the upright piece.
IMG_0665

The plunge router ready for action.IMG_0666

The first hole successfully routed in the underside of the upper section.IMG_0667

The router and jig set up on the first of the upright pieces on the lower section.IMG_0668

The first hole successfully routed in the upright of the lower section.  IMG_0669

Once all eight holes were drilled I needed to turn my attention to cleaning up the underside of the shelf on the upper section.  There was a small section of the upright still remaining.  This was due to the thickness of the formica that I had used to protect the underside of the shelf.  In order to get rid of this I removed the top plate of my jig and clamped the jig to the upright once again.

IMG_0670

I then registered the router bit to the surface of the shelf and used it to clean up the 1/16″ or so of upright remaining.

IMG_0671

The resulting surface.  Clean and flush with the underside of the shelf.

IMG_0672

Lastly I needed to ensure that the cuts on the uprights of the lower section were clean and at a perfect ninety degree angle.  If the cuts I had made using the flush cut saw were at a slight angle then it would be impossible to achieve an invisible joint.  I also needed to make sure that each upright was exactly the same length so that the piece stood upright.  Once again I used my jig without the cover plate.  I also used a piece of wood registering from the lowest shelf to the underside of the jig in order to cut each upright to the same length.  I set everything up in order to remove the bare minimum of wood and so maintain as much of the length of the upright as possible.  IMG_0673

The upright after being routed.  Clean edges and a perfect ninety degree cut.IMG_0674

Then it was off to the lathe in order to turn a dowel to the correct diameter out of a piece of straight grained hard maple.

IMG_0675

After cutting each dowle to length I cut a couple of thin slots in each one.  This was to allow the excess glue in the mortise a place to escape when everything was clamped together.

IMG_0678

The dowels in place …IMG_0679

… and the test fit.  It looked perfect.  I was equal portions of relieved, ecstatic and mildly surprised at this point.  The blue tape is in place to protect the surfaces from any residual glue squeeze out during the clamping.

IMG_0680

No pictures of the clamping procedure.  Anyone who has done a glue up knows that there is no time to grab the camera for a quick snap shot during a glue up.  It went smoothly, primarily because I have learnt from bitter experience to always do a test glue up and have all the clamps ready and conveniently positioned long before I open the bottle of glue.  I decided to use Titebond Liquid Hide Glue for this.  As well as a longer clamp time it also seemed an appropriate glue to use for a fine piece of furniture such as the one I was working on.

IMG_0681

The Bessey clamps are such a pleasure to use!IMG_0682

IMG_0683

With the glue up complete, I closed the workshop for the night and came back the next morning with great anticipation to see how it had all come together.  After removing the clamps and tape I tested each joint and it seemed that the structural integrity of the piece had been maintained.  I was also delighted to find that the joints were near invisible.  Someone would have to look long and hard in order to see that the piece had been cut down.  The image below shows one of the joints.

IMG_0684

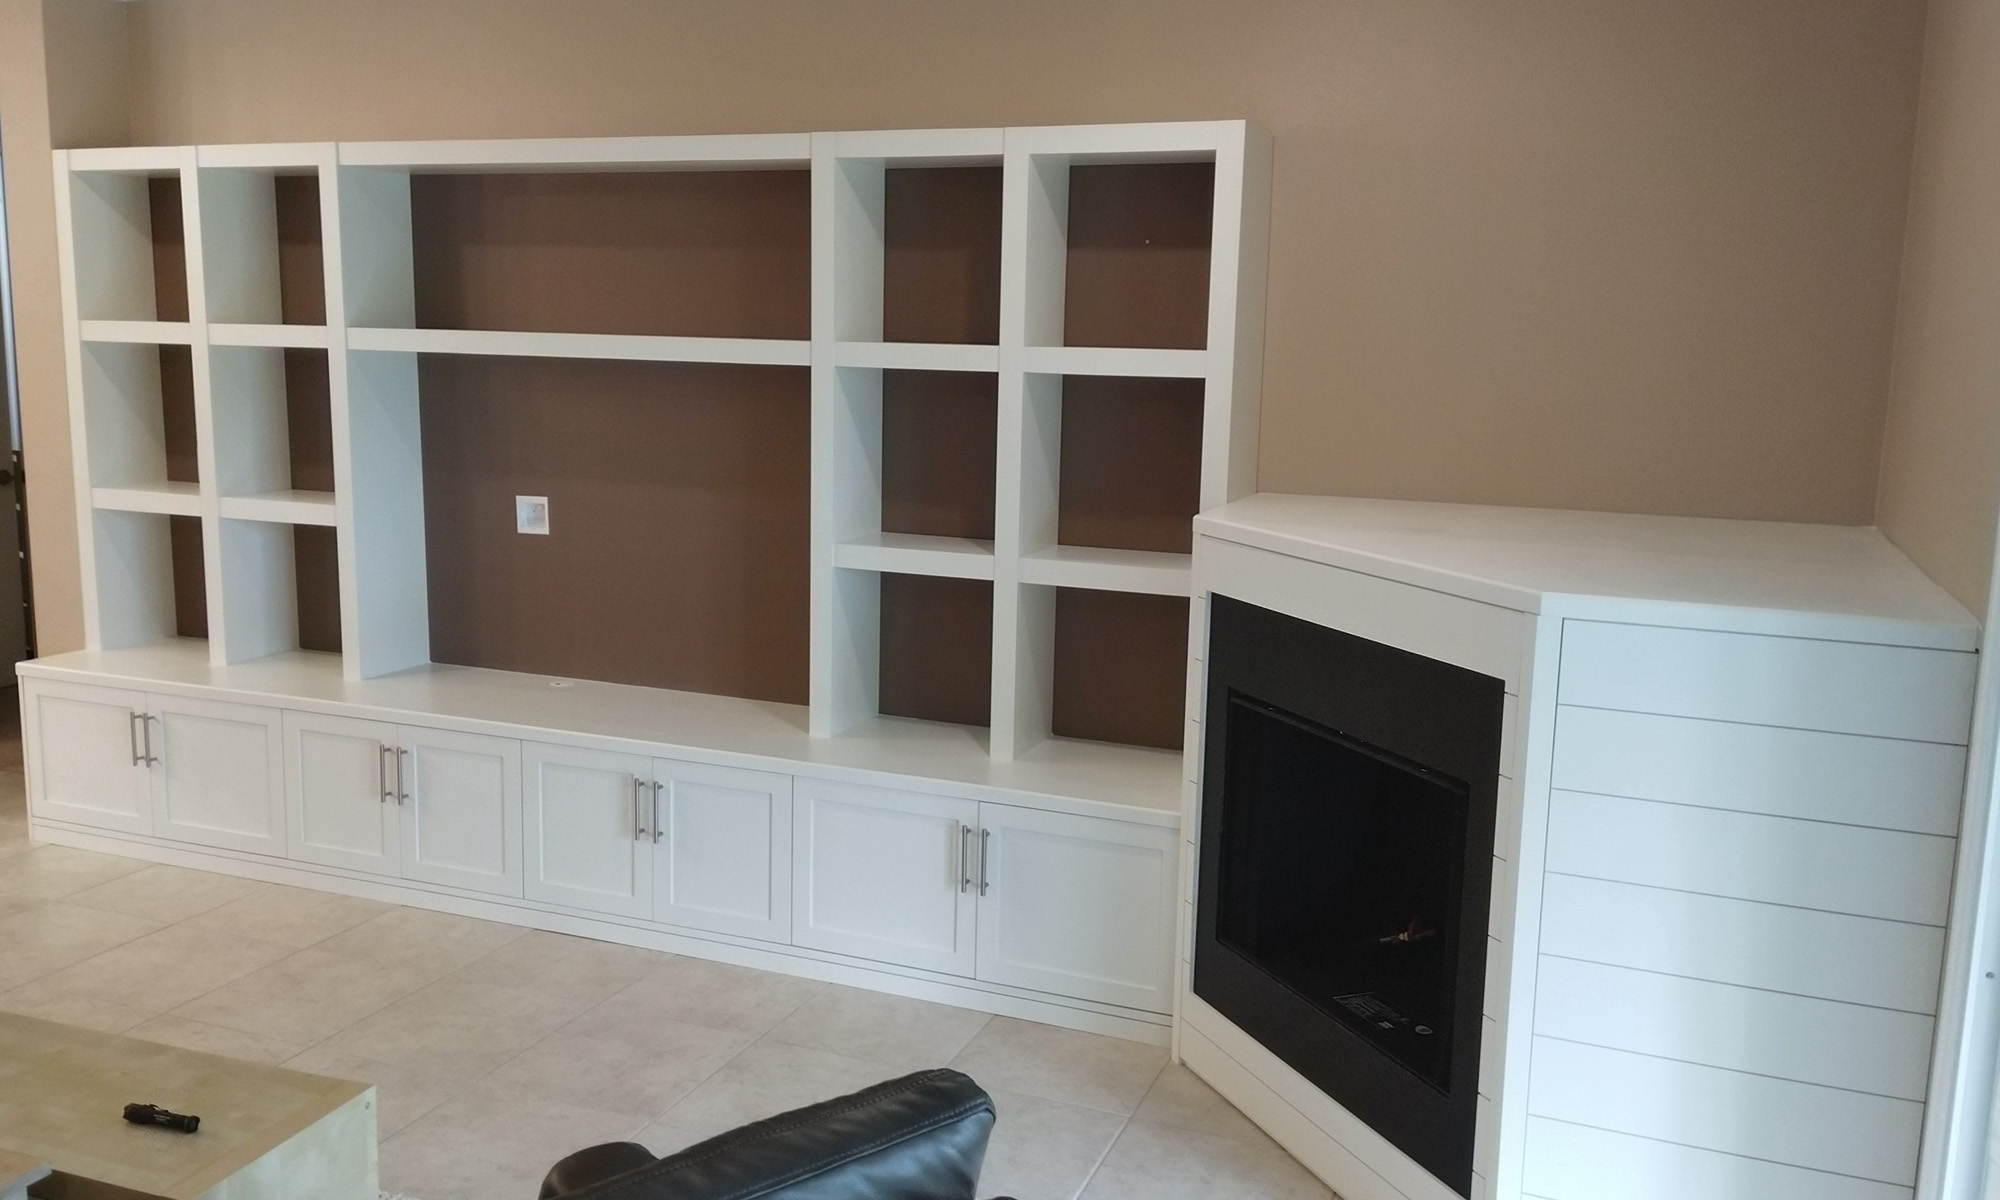
A couple of shots of the modified Étagère.   This was a pretty challenging project, involving many of the things that are so enjoyable about woodworking.  Creative thinking, problem solving, care and attention to detail.

IMG_0689

IMG_0690


Building a Flat Panel Door

Build a flat panel door

A flat panel door can be defined as a door in which the panel has no bevel or hip raise.  It can still be considered a five piece door,  as it consists of two stiles, two frames and a panel.  The stiles are the vertical members of the frame, while the rails are the horizontal members.

The first step is to mill the wood for the stiles and rails of the doors.  I am building three doors for some base cabinets.  All three doors are the same size and the cabinets will be painted white.  I am using poplar for the frame of the door and 1/4″ plywood for the flat panel.  The stiles and rails are 2 1/2″ wide, 3/4″ thick and I cut them an inch or so longer than what I needed.  While I was preparing the wood I also took the time to make some scrap pieces the same width and thickness to be used for test cuts.  You can also see my set up block in the picture.  You can also see my raised panel router bit set.  For this project I will only be using the two bits on the left, the monster raised panel bit will stay in the box.
Build a flat panel door
Mount the bit for cutting the profile on one edge of the stile and rails.  I use my set up block to adjust the height of the router bit, although I still plan on making some test cuts in scrap wood.   The profile in both the stiles and rails will be cut with the face side (the outside of the door) down.

Build a flat panel door

A close up shot of my set up block.  I keep this in a drawer right next to my raised panel router bit set.

Build a flat panel door

The fence is then moved so that it is flush with the bearing of the bit.

Build a flat panel door

After routing a profile in a scrap piece of wood, I use the rail section of my set up block to see if the two surfaces meet flush on the top surface.  I got lucky this time and the fit was perfect 🙂

Build a flat panel door

I then routed the profile on one edge of all the stiles and rails.  Remember the cuts are made with the show side down.  For this project it was not that important as the doors will be painted, but if you are not painting the doors you will want to take care to chose the best side of each stile and rail and then to route it with that side down.

Build a flat panel door

Build a flat panel door

Build a flat panel door

I then took the stiles to the table saw and used a cross cut sled cut them to length.  To calculate this length I measure the height of the door opening and added 1 /4″.   My crosscut sled was not quite wide enough to enable me to use its stop block, so I used a fence clamp and a block of wood as a stop block.

Build a flat panel door

Build a flat panel door

The next step was to calculate the length of the rails.  I wanted the door to overlap the door opening by 5/8″ all round.  The depth of the groove in the stiles was 3/8″.  The width of the stiles was 2 1/2″.   So the length of the stiles needed to be:

(Door opening width) + (2 times 5/8″) – (2 times 2 1/2″) + (2 times 3/8″)

To many years in school dealing with the metric system means that I suck  at working with fractional inches, so I always reach for my handy ProjectCalc Plus at times like these!

Build a flat panel door

Build a flat panel door

Build a flat panel door

The router bit for routing the sticks in the rails is mounted in the router table and set to height using the set up block.   Again the fence is positioned so that it is flush with the bearing.

Build a flat panel door

Build a flat panel door

Remeber those scrap pieces of wood.  Route the profile in the end of one of them.  When making this cut it is important the the rail be kept flat on the table face down and that it remain at 90 degrees to the fence.  It is also important that the cut be backed up to prevent tear out as you are routing end grain.  There are a number of commercial rail coping jigs that will allow you to achieve this easily.  I don’t have one, although every time I build some doors I promise to buy myself one.  So what I normally end up doing is to cut a piece of 3/4″ plywood or mdf, making sure that one corner is a perfect 90 degrees.  Then I use that sacrificial piece of plywood to hold the rail square to the fence and to back up the cut.

Build a flat panel door

Build a flat panel door

Satisified that the set up of the router bit was correct, I made the coping cut in all of the rails.  Remember to make this cut with the face side of the rail down!!

Build a flat panel door

Build a flat panel door

Build a flat panel door

Build a flat panel door
Calculating the size of the panel is pretty simple. Measure the frame opening, then add for the 3/8″ groove all round and then subtract to allow for expansion.  With a solid wood panel you would want to subtract at least 1/8″ all round.  With the more stable plywood panel that I’m using I subtracted 1/16″ all round.  The groove is 1/4″ wide so the undersize 1/4″ plywood fits pretty loose in the groove.  However with a couple of coats of paint it should fit just right.

Build a flat panel door

Test fitting the panel.

Build a flat panel door

I like to paint the panel before gluing the door together.  That way if there is any expansion of the frame then there won’t be any unfinished part of the panel exposed.  This is probably more important with solid wood panels, but it is a good habit to get into.

When gluing the door together the panel is not glued into the groove.  Glue is only applied to the coping cuts on the rails.  The glue should be done on a flat surface so that the door will be flat and it should be checked for square.  I really find the square check for tape measures useful when checking for square.

Build a flat panel door

Build a flat panel door

In closing, and before you head out to the shop to start making a set of doors, I invite you to review a previous post on router feed direction and bit rotation.

Router feed direction and bit rotation

I recently purchased a set of Rockler’s Bench Cookies.  I’ve been reading about them all over the internet and no doubt I’m probably the last woodworker in the world to have purchased a set 🙂  I was excited to try them out and thought I would combine it with an article about router feed direction and bit rotation.

I use a router a lot in my workshop, both hand held and table router.  However, I can remember when I got my first router and the learning curve I went through figuring out which direction to move the router when routing by hand or the workpiece when routing on the table router.   Hopefully I can help others out and make that learning curve not quite as exciting!

Essentially the workpiece always needs to be feed into the bit, so the first thing you need to know is which way is the bit rotating.  Lets deal with the table mounter router first.   Hold out your right hand in a classic “thumbs up” gesture.  Imagine your hand is the router and your right thumb is the router bit.  The direction of the router bit follows the curve of your fingers.  In this case, it is counter clockwise.  You can see this clearly in the picture below.

ACT_857601

Now rotate your right hand into a “thumbs down” gesture.  Again imagine your hand is the router and your right thumb is the router bit.  The direction of the router bit is still indicated by the curve of your fingers, in this case it is clockwise.  You can see this in the picture below.

ACT_857702

This “right-hand thumb rule” applies to almost anything that spins, faucets, right hand thread screws etc.

So, moving back to the router table, you can see that in order to feed the workpiece into the router bit, you need to feed from right to left, assuming you are standing facing the fence.   By feeding from right to left you are feeding the workpiece against the direction of rotation of the bit.  The natural reaction as the workpiece contacts with the bit is to push the workpiece back towards you.  By controlling the workpiece, by hand and through the use of featherboards, you prevent this from happening.

Feeding from left to right, the rotation of the bit would grab the workpiece and pull it forcefully from right to left.  This can happen in the blink of an eye and the danger is, aside from ruining the workpiece, that you don’t release it and your fingers are pulled towards the router bit.

ACT_858105

For the same reason the fence always needs to be positioned so that side of the router bit that is furthest away from the fence is doing the cutting.  To illustrate, suppose you need to route a groove or dado that is 1″ wide, but the largest bit you have is a 3/4″ straight bit.  Obviously the groove will have to be cut with two passes.  The first pass will form a 3/4″ groove and then the fence can be moved 1/4″ in order to make the groove a full 1″ wide after the second pass.  No problem.

However, it is very important that the fence be moved in the right direction before the second pass.  Moving the fence closer to the router bit would mean that the side of the router bit that is closest to the fence is doing the cutting.  Remember the way the bit is rotating?  This would cause the bit to pull the workpiece away from you forcefully.   The following picture shows what not to do!!

ACT_858004

The correct method is to move the fence away from the router bit so that the 1/4″ section of the groove you are removing with the second pass is on the side of the router bit farthest from the fence.  The following picture show the correct position of the fence relative to the router bit.  By setting up for the second pass this way you are once again feeding the workpiece into the direction of rotation of the bit.

ACT_857903

Cuts like this need to be planned very carefully to ensure that the correct side of the router bit is doing the cutting.

Moving back to the hand held router, there are two different scenarios which determine feed direction.  Imagine a circular picture frame that you need to profile both the external and internal edges of.  Which direction to you rout?

Hold your right hand out again with fingers closed except your thumb and index finger.  Imagine your hand is the router.  If your right thumb is pointing to the workpiece then your index finger is showing the direction of travel of the router.  Take a look at the picture below.

ACT_858506

You can see that when routing the outside edge of the picture frame, you need to move the router in a counter clockwise direction.  When routing the inside edge of the picture frame, you need to move the router in a clockwise direction.

I have found these two “right hand” memory aids very useful in determining router bit rotation and router feed direction.  I hope you do to.

I’ll end the article with a short video clip showing the Rockler Bench Cookies supporting a workpiece I was making some test cuts on.  I found they held the workpiece securely and it was nice to have it raised above the table.  I did find that I needed to lightly support the workpiece with my inboard hand to prevent it from tipping slightly.  I’m sure that if the workpiece was wider or if I had been using an offset base on the router, this would not have been necessary.   I can also see the Bench Cookies will be useful for other applications, sanding and finishing are two that come to mind.

In full disclosure, the links are affiliate links.  If you purchase anything from Rockler via the links, Rockler will send me buckets of money and I’ll be able to quit my day job and play in my workshop every day.  Not necessarily a bad thing 🙂

Inlaid half blind dovetail joints

I planned to make inlaid half blind dovetail joints for the frame of the knife display case.  The frame is made from African Mahogany and the inlays are tiger maple.  This article will show how I made the joints.  For more information on the Leigh Jig please visit their website.  The article which I followed is one of Leigh’s technical bulletins.   Their manuals are very well written and illustrated.  Another excellent source for information on the Leigh Jigs is Al Navas’s blog,  Sandal Woods.

ACT_846916

When making half blind dovetails with the Leigh Jig it is critical to understand the following:

  • Bit selection is based on the thickness of the pin board.
  • The bit selected will only produce one specific cutting depth.  If you have the bit set to low the joint will be too tight, if you have the bit set to high the joint will be too loose.  Only one depth of cut will make a perfect joint.
  • The pins and the tails are both routed with the same bit.
  • The scale setting determines how much the pins protrude from the tails.  You only want the pins to protrude by about 1/64″ to make for easy clean up of the joint.

The process for making inlaid half blind dovetail joints consists of first making a set of end on end half blind dovetails with two pieces of contrasting woods.  Then making a regular half blind dovetail joint where the tails are smaller.

The first step was to prepare the lumber to the right dimensions.  While I was doing this I also prepared a couple of test pieces to use in setting up the router and jig and to practice the joint on.  I marked all the pieces with white chalk, indicating the sides of the frames (the tail boards) and the front/back of the frame (the pin boards).  I also marked the show side or outside of the frame.

As well as the four sides of the frame, I also needed to prepare a spacer board, the inlay board and two shims.  The spacer board is used on the Leigh Jig to rest the guide fingers on.  The shims are used to help set the fingers of the jig when doing the inlay.  The inlay board and shims needed to be milled to a particular thickness.  The pin and tail boards are 5/8″ thick and I wanted an inlay of 1/16″ thickness.   I was using the 120-8  cutter (router bit) which has a 14 degree angle and a cutting depth of 7/16″.

The inlay board thickness needed to  be equal to the cutting depth + inlay thickness.  i.e 7/16″ + 1/16″ = 1/2″

The shim thickness was determined by the following formula in the Leigh Bulletin:  inlay thickness x 1.28 i.e 1/16″ x 1.28 = 0.08″   (The angle of the cutter bit determines the factor by which you multiply the inlay thickness by in order to determine the shim thickness.

ACT_845906

Having prepared all the lumber the next step was to layout the fingers on the jig.  As my board was only 2 1/2″ wide there were not going to be many dovetails!  It is important to make sure that you have room for at least two shim thickness between each pair of fingers.  The guide fingers need to be moved by this amount later in the proceedings.

ACT_846007

The assembly is then rotated into the half blind pins mode with the scale set to the thickness of the tail board. The pin board is placed horizontally in the jig and moved forward so that it touches the tail board that is vertical in the jig.  You can see in the image below that the tail board is set low enough that the router bit will not touch it!

ACT_846108

The pin board is then routed.  This is not the normal procedure when making half blind dovetails using the Leigh Jig.  Normally the tail board is routed first.  For inlaid half blind dovetails the pin board needs to be routed first so that an inlay can be glued into the pins.

ACT_846209

The assembly is now rotated to the half blind tails mode and the inlay board is placed horizontally in the jig.  It is moved forward so that it is flush with the front face of the tail board mounted vertically in the jig.  The inlay board is routed out.  When routing the inlay board you need to make sure you route back far enough so that there is enough of a tail to fill the tail sockets.

ACT_846310

After making a test fit I took the inlay board to my cross cut sled on my table saw and cut off a couple inches of the end which had been routed.  I then glued the inlay into the pin board.  As you can see in the image below I did this on both ends of the pin board.

ACT_846411

Once the glue had cured, I took the piece to my cross cut sled again and cut the inlay board flush with the end of the pin board.

ACT_846512

Now comes the magic trick.  With the jig assembly still in the half blind tails mode the guide fingers need to be moved so that the next set of pins and tails that are cut are slightly smaller than the first set.  The Leigh Bulletin does a great job of explaining how the guide fingers need to be moved, I’ll do my best here.

The right hand fingers are loosened and moved to the right by one shim thickness.  They are then tightened.  The left hand fingers are then loosened, slid to the left so that two shims fit between the left and right fingers, then the left finger is tightened.  The half pin guides need only to be moved inwards by one shim thickness.  The easy way to do this is to move the “spare” fingers (the ones to the far left and right of the joint that are just used to rest the router on) flush to the half pin guides.  Then the half pin guides are loosened, slid in by the the thickness of one shim and tightened.  The “spare” guides are then moved back out.  It sounds pretty complicated, but it is actually fairly simple to do.

Having moved the guides, and with the assembly still in the half blind tails mode, the tail board is routed out.  As you can see in the image below the tail board is mounted vertical in the jig and raised so that it touches the underside of the guide fingers.

ACT_846613

We’re nearly there!!  The assembly is rotated to the half blind pins mode.  The pin board with the inlay is mounted horizontally in the jig and moved forward so that it touches the tail board that is vertical in the jig.  Again you can see in the image below that the tail board is set low enough that the router bit will not touch it!

ACT_846714

The pin board is routed out and finally the inlaid joint is revealed!  I don’t need to tell you how exciting a moment this is!

ACT_846815

The results of all those steps, an inlaid half blind dovetail joint.

ACT_846916

Pockets for the knives

After completing a test piece, it was time to route out all the pockets for the knives. 19 knives in total, with the pockets to be routed in a beautiful piece of 7/8″ thick tiger maple. A little nerve wracking to say the least!

Here are some progress pictures. The Eagle head of the pocket was routed first as that was the deepest pocket.

ACT_845301

Next the main body of the knives were routed out.

ACT_845402

I then removed the 1/4 plywood template from the back of the maple. That in itself was a struggle, it’s amazing how strong double sided carpet tape is! Using a 1″ forstener bit I drilled semi circles above the template of each knife. This was to be the guide to route out a small finger pocket. I then clamped the plywood to the front of the maple and using a plunge router with a core bit and collar cut out the finger pockets.

ACT_845603

Here is a detail shot of one of the knife pockets.

ACT_845704

Finally here is a shot of the tiger maple board complete with all the knives. I was pleasantly surprised when each knife dropped neatly in it’s designated pocket 🙂

ACT_845805

The next step will be to make the frame of the case. I plan on using African Mahogany with half blind dovetail joints inlaid with maple.

Pockets for knife display case – test piece

I decided to do a test piece for the pockets I will be making for the knife display case. I’ve learned the value of test pieces from bitter experience. The extra time taken always seems to pay dividends as you figure out a process using a piece of scrap wood.

The first step was to trace the pattern of a knife onto a piece of 1/4″ plywood and onto a piece of scrap maple. I also drew a line on the pattern separating the thicker eagle head portion of the knife from the rest of the handle.

ACT_844501

Using my scroll saw I cut out the eagle head portion of the pattern in the plywood. On the maple piece I hogged out the same portion using a 3/4″ forstner bit in my drill press. I set the drill press so that it would drill to a depth just slightly less of the final depth of the pocket.

ACT_844602

Then, taking care to orientate it correctly, I attached the plywood to the back of the maple with double stick tape, and using a 3/4″ router bit and the Daisy Pin Router, I routed out as much of the pocket as I could.

ACT_844703

Because of the diameter of the 3/4″ router bit I was not able to route out the area of the pocket at the eagle’s beak. So I switched to a 1/8″ router bit and also changed the guide pin in the Daisy Pin Router to 1/8″. With the smaller diameter bit I was able to access and rout out the area at the eagle’s beak.

ACT_844804

I then removed the plywood from the maple test piece, and took it back to the scroll saw, where I cut out the rest of the pattern. I also took the maple piece back to the drill press and hogged out as much as I could with the forstner bit. You can see that portion of the pocket will not be as deep as the eagle head portion.

ACT_844905

The 1/4″ plywood was taped to the back of the maple piece again, and I switched both the router bit and Daisy Pin Router guide pin back to 3/4″. Then the pocket was routed out. Because this section of the pocket was not as deep I did not have to do a plunge cut with the router. I simple placed the piece over the router bit in the deeper pocket, turned the router on and then moved the piece across to route out the shallower section.

ACT_845106

The completed pocket with the knife sitting in it.

ACT_845207

With a total of 19 pockets to create in the actual knife display case, it was worth taking the time to make a test piece and find the most efficient and accurate method.

Daisy Pin Router

My initial plan to create the slots holding the knives in the display case was to use my scroll saw. However, the case dimensions were 16″ x 30″ which would have been to big for my scroll saw. Further, when I took delivery of the knives I saw the eagle part of the handle was considerably thicker than the rest of the handle. This meant the slots would have to be at a varied depth in order for the knives to sit flat. The only way to achieve this would be with a router.

Rather than having to factor in the thickness of a router collar when making the template, I decided to buy a Daisy Pin Router from MLCS Woodworking. Like I really needed an excuse to buy a new tool 🙂 The pin router includes four steel guide pin of varying sizes (1/4″, 5/16″, 3/8″ and 1/2″) and I also purchased the corresponding set of router bits to go with the pin router. As always, with MLCS, shipping was prompt and the package arrived in good condition. As you can see in the next shot, some assembly and set up is required.

ACT_843701

After attaching the lever to the arm, I screwed the 1/2″ guide pin into the collet of my router. I then moved the arm around to see where it would fit best. Ideally I would have preferred bolting it to the table on the fence side of the router. However, I had very limited access to the underside of my router table at that location, so it would have been difficult tightening and removing the bolts. I ended up locating it to the left and back of the router. This meant that I would need to feed the workpiece from right to left, which shouldn’t be a problem as I have enough of the table in front of the router to support the workpiece. I also took care to make sure the arm did not cover the access hole for the router lift.

ACT_843802

The next step was to mark where the four holes were to be drilled in the router table. I used a transfer punch to do this accurately. I drilled the holes carefully using a 5/16″ bit. The directions called for using a 3/8″ bit, but that seemed a bit big to me.

ACT_843903

The next shot shows the pin router bolted to the table with the 1/2″ pin still secured in the router collet.

ACT_844004

I was excited to take it for a test drive, so I cut a scrap piece of 1/4″ plywood, drilled a hole in it with a forstner bit and then secured it to a piece of maple with double sided tape. I set the guide pin so that it was just above the maple, but below the height of the plywood.

ACT_844105

ACT_844206

Routing the outside profile was quick and easy. I did it in four passes, raising the bit each pass. I routed the end grain first and then the side grain to avoid tear out.

ACT_844307

Routing the interior profile took a bit more care, but was still quick and easy. I raised the guide pin, started the router, then carefully positioned the workpiece over the bit taking care to ensure the guide pin was inside of the hole cut out in the plywood. Then I plunged the workpiece down on the bit, held the workpiece securely while dropping and locking the guide pin in place. Then it was just a matter of moving the workpiece around within the constraints of the guide pin in the cut out hole. I had to perform these steps a couple of times, turning off the router and raising the bit incrementally each time. When I flipped the piece over it was good to see a perfect reproduction of the circle in the workpiece!

ACT_844408

Overall I’m very pleased with the Daisy Pin Router. I think it will work great for the knife display case and I’m sure I will come up with many more uses for it as time goes by.